5 Steps for Proper Shipping Container Ground Preparation
Table of Contents
- Table of Contents
- The Importance of a Level Foundation for Container Integrity
- Preventing Structural Stress and Door Misalignment
- Managing Moisture and Preventing Under-Unit Corrosion
- Step 1: Assessing Soil Stability and Site Drainage
- Step 2: Clearing and Leveling the Footprint
- Removing Vegetation and Organic Debris
- Step 3: Selecting the Right Foundation Type
- Gravel Pads and Concrete Pavers for Temporary Placements
- Concrete Slabs and Piers for Permanent Structures
- Step 4: Installing a Vapor Barrier and Drainage Layer
- Step 5: Final Leveling and Corner Support Placement
- Pre-Delivery Checklist and Maintenance Tips
Table of Contents
- The Importance of a Level Foundation for Container Integrity
- Step 1: Assessing Soil Stability and Site Drainage
- Step 2: Clearing and Leveling the Footprint
- Step 3: Selecting the Right Foundation Type
- Step 4: Installing a Vapor Barrier and Drainage Layer
- Step 5: Final Leveling and Corner Support Placement
- Pre-Delivery Checklist and Maintenance Tips
A shipping container weighs between 3,500 and 8,500 pounds empty, depending on the size. A loaded 40-foot unit can tip the scales at over 60,000 pounds. That kind of weight sitting on unprepared ground doesn’t just settle: it shifts, sinks, and warps in ways that compromise the entire structure over time. Proper ground preparation before your container arrives is the single most important step you can take to protect your investment, whether you’re setting up a job site storage unit, a farm workshop, or a permanent backyard office.
Most delivery problems and long-term container damage trace back to site prep that was rushed or skipped entirely. Lease Lane Containers’ Raleigh-based team regularly walks buyers through delivery planning and site access requirements because getting the ground right before the truck shows up saves real money and headaches. The five steps below give you a clear, repeatable process for preparing your ground so your container sits level, drains properly, and lasts for years without structural issues.
The Importance of a Level Foundation for Container Integrity
Shipping containers are engineered as rigid steel boxes designed to stack and travel on ships, trains, and flatbed trucks. Their structural strength comes from the frame, particularly the corner castings and bottom rails. But that strength depends on even weight distribution. When a container sits on uneven or soft ground, the load concentrates on specific points rather than spreading across the frame as designed. This creates stress patterns the container was never built to handle.
A 20-foot container measures roughly 20 ft x 8 ft x 8.5 ft and weighs about 5,070 pounds empty. A 40-foot high cube shipping container stretches to 40 ft x 8 ft x 9.5 ft and weighs approximately 8,775 pounds before you put anything inside. These are not light structures, and the ground beneath them needs to support that weight consistently across every season, through rain, freeze-thaw cycles, and soil expansion.
Preventing Structural Stress and Door Misalignment
The most immediate sign of a poorly prepared site is doors that won’t open or close properly. Container doors are precision-fit at the factory with tolerances measured in fractions of an inch. When the frame twists even slightly due to uneven support, those tolerances disappear. You’ll notice the locking rods becoming difficult to engage, gaskets failing to seal, and in severe cases, doors that jam completely.
Frame twist also stresses the corrugated wall panels. Over months, you may see panel buckling or hear popping sounds as the steel flexes under uneven loads. These aren’t cosmetic issues. A twisted frame weakens the container’s ability to bear weight on top, which matters if you’re stacking containers or planning a roof-mounted solar array. The fix for a twisted frame is expensive and sometimes impossible: prevention through proper ground prep is the only reliable approach.
Managing Moisture and Preventing Under-Unit Corrosion
A container sitting directly on bare soil traps moisture between the steel floor frame and the ground. This creates a persistent damp environment where corrosion accelerates rapidly. Even containers rated as wind and watertight will develop rust on the undercarriage if moisture has nowhere to go.
The bottom cross-members and floor joists are particularly vulnerable. These structural components are typically made from Corten steel, which resists atmospheric corrosion well but struggles in constant contact with wet soil. Ground contact corrosion can eat through floor supports within three to five years in humid climates like North Carolina’s, where annual rainfall averages around 46 inches. Elevating the container even four to six inches off the ground and ensuring airflow underneath dramatically extends the life of the floor system.
Step 1: Assessing Soil Stability and Site Drainage
Before you move a single shovel of dirt, you need to understand what you’re working with. Walk the site during or immediately after a rainstorm. Where does water pool? Which direction does it flow? These observations tell you more about your site’s drainage characteristics than any dry-weather inspection.
Soil type determines bearing capacity: how much weight the ground can support per square foot without sinking. Sandy soils drain well but can shift under heavy loads. Clay soils hold weight better when dry but become soft and unstable when saturated. Loam, a mix of sand, silt, and clay, generally offers the best combination of drainage and load-bearing capacity.
For a quick field test, grab a handful of moist soil and squeeze it. If it holds its shape and feels sticky, you’re dealing with high clay content. If it crumbles apart, it’s sandy. Either extreme requires additional preparation. Clay-heavy sites in the Raleigh area and across the Piedmont region of North Carolina are common, and they demand particular attention to drainage because clay expands when wet and contracts when dry, creating seasonal movement under your container.
Check for a high water table by digging a test hole about two feet deep. If water seeps in within 24 hours, you’ll need to plan for drainage improvements or consider a raised foundation system. Properties near creeks, in floodplains, or at the base of slopes frequently have this issue. Contact your local county planning office: Wake County’s planning department at (919) 856-6335 can provide flood zone maps and may have soil survey data for your specific parcel.
Step 2: Clearing and Leveling the Footprint
With your site assessment complete, the physical work begins. Your cleared area should extend at least three feet beyond the container footprint on all sides. For a 20-foot container, that means clearing a space roughly 26 ft x 14 ft. For a 40-foot unit, plan on 46 ft x 14 ft minimum. This extra space allows for drainage grading, access for maintenance, and clearance for door swing.
Use a transit level or a laser level to establish your grade. The target is a slight slope of about 1-2% away from the center of the pad: roughly a quarter inch of fall per foot. This ensures rainwater moves away from the container rather than pooling underneath it. Mark your desired grade with stakes and string lines before you start moving earth.
Removing Vegetation and Organic Debris
Strip all grass, roots, and topsoil from the footprint area. Organic material decomposes over time, creating voids and soft spots beneath your container. A sod cutter handles grass removal efficiently. For brush and small trees, a stump grinder ensures roots won’t regrow and push against your foundation.
Remove topsoil to a depth of at least six inches. Topsoil is rich in organic matter and holds moisture, both qualities you want to eliminate from your foundation zone. Stockpile the topsoil nearby: it’s useful for landscaping around the finished site. The exposed subsoil should be compacted using a plate compactor or a jumping jack compactor, depending on soil type. Clay soils respond better to a jumping jack’s impact force, while granular soils compact well under a plate compactor’s vibration.
After compacting, check your grade again. Compaction can change surface elevations by an inch or more, and you want to catch any discrepancies before adding foundation materials on top. A properly compacted subgrade should show no visible footprints when you walk across it.
Step 3: Selecting the Right Foundation Type
Your foundation choice depends on three factors: how long the container will stay, what you’re using it for, and your budget. A temporary storage setup on a construction site has different requirements than a permanent container office or workshop. Matching the foundation to the use case prevents both overspending and under-building.
Gravel Pads and Concrete Pavers for Temporary Placements
A compacted gravel pad is the most common foundation for containers used as storage or temporary workspaces. It’s affordable, drains well, and can be installed in a single day. Use crushed stone (not rounded river rock) in a mix of sizes from 3/4-inch down to fines. The angular edges of crushed stone lock together under compaction, creating a stable surface that rounded stones can’t match.
Build your gravel pad in lifts of three to four inches, compacting each layer before adding the next. A finished pad should be six to eight inches deep. Budget roughly $500 to $1,500 in materials for a 20-foot container pad, depending on local gravel prices and whether you’re doing the work yourself or hiring it out.
Concrete pavers placed at the four corner points offer another option for temporary or semi-permanent setups. Each paver should be at least 24 inches square and two inches thick, set on a compacted gravel base. This approach costs less than a full gravel pad and still keeps the container elevated off the ground. The downside is that pavers only support the corners, leaving the middle of the container’s bottom rails unsupported: fine for light storage, but not ideal for heavy loads.
Concrete Slabs and Piers for Permanent Structures
For permanent installations, especially container offices or modified living spaces, a concrete slab or pier foundation is the right call. A four-inch reinforced concrete slab with a compacted gravel sub-base provides uniform support across the entire container footprint. Expect to pay $4 to $8 per square foot for a professionally poured slab, putting a 20-foot container pad in the $1,300 to $2,600 range.
Concrete piers are a strong alternative, especially on sloped sites. Piers are individual concrete columns poured into holes drilled below the frost line, which sits at about 12 inches in central North Carolina. The container’s corner castings rest on these piers, and additional piers can be placed at midpoints along the bottom rails for longer containers. Pier foundations typically cost $200 to $500 per pier installed, with most setups requiring four to six piers.
If you’re planning a permanent structure, check with your local building department about permit requirements. Many jurisdictions treat permanently placed containers as structures subject to building codes, including foundation specifications.
Step 4: Installing a Vapor Barrier and Drainage Layer
Moisture management doesn’t stop at grading the site. A vapor barrier between the ground and your foundation materials prevents ground moisture from wicking upward into the container’s floor system. This step is frequently skipped, and it’s one of the primary reasons containers develop premature floor rot and undercarriage corrosion.
Use a 6-mil polyethylene sheet as your vapor barrier. Lay it across the compacted subgrade before adding gravel or pouring concrete. Overlap seams by at least 12 inches and tape them with waterproof seam tape. Extend the barrier six inches beyond the foundation footprint on all sides, then trim it after the foundation is complete.
On sites with high water tables or heavy clay soils, add a French drain around the perimeter of the container pad. A French drain is simply a perforated pipe laid in a gravel-filled trench that collects and redirects subsurface water away from your foundation. Dig the trench 12 to 18 inches deep along the uphill side of the pad, sloping the pipe at a minimum of 1% grade toward your discharge point. The discharge point should direct water at least 10 feet from the container site, ideally toward a natural drainage swale or storm drain.
For sites in flood-prone areas or low-lying terrain, consider a layer of geotextile fabric beneath your gravel pad. This fabric prevents fine soil particles from migrating up into the gravel over time, which would reduce the gravel’s drainage capacity. It’s an inexpensive addition, typically around $0.15 to $0.50 per square foot, that pays for itself by keeping your drainage layer functional for years.
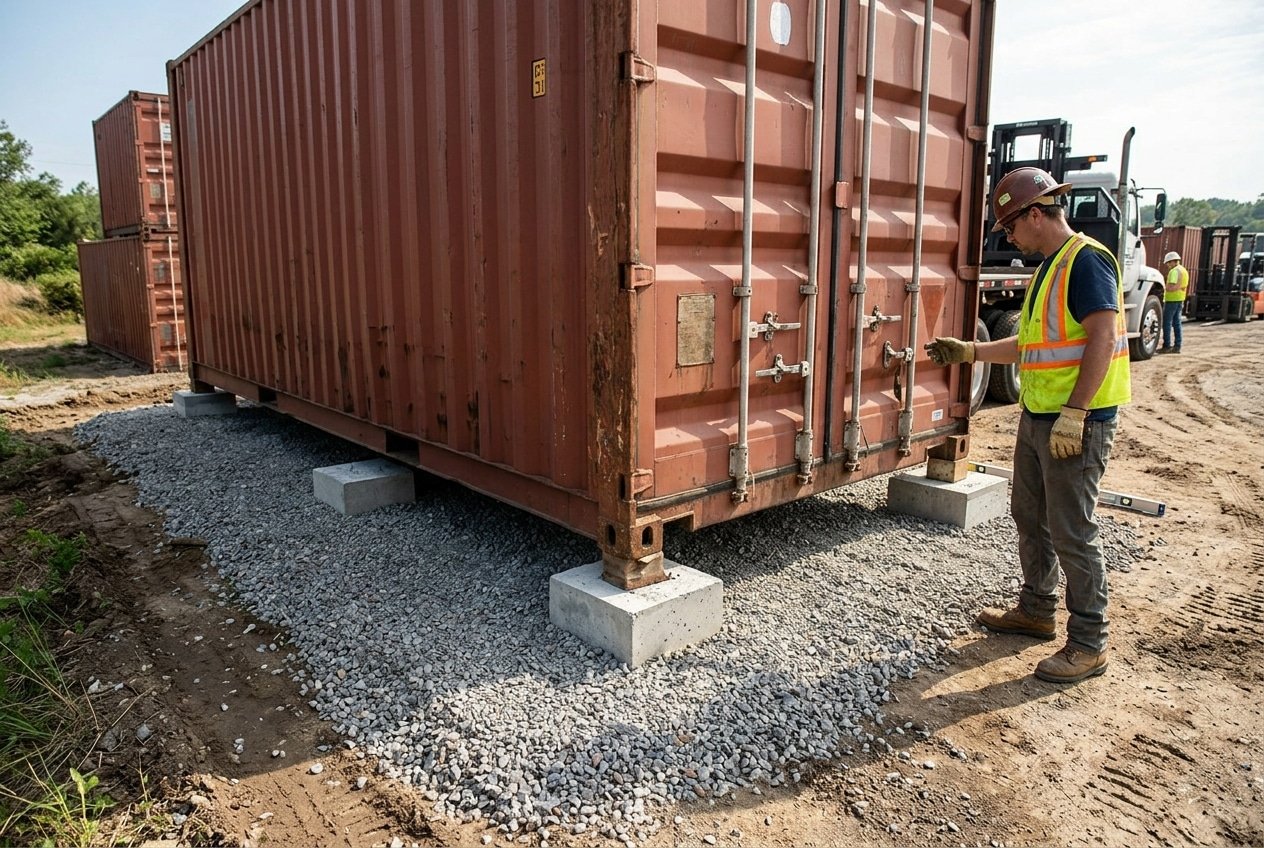
Step 5: Final Leveling and Corner Support Placement
This is where precision matters most. Your container’s corner castings are the primary load-bearing points, and they need to be level within 1/2 inch across the entire footprint. For a 40-foot container, that means achieving 1/2-inch tolerance over a 40-foot span: a demanding but achievable target with the right tools.
Use a laser level or a builder’s level to check elevation at each corner point. Place your support blocks or piers and verify that all four corners sit at the same height. Shim as needed using steel plates rather than wood. Wood shims compress, rot, and attract insects. Steel shims maintain their dimensions indefinitely and can handle the concentrated loads at corner castings without deforming.
For gravel pad foundations, set concrete blocks or heavy-duty concrete pavers at each corner location, pressing them firmly into the compacted gravel. Check level across diagonal corners as well as along each side. Diagonal measurements that differ by more than 1/4 inch indicate the pad isn’t truly flat, and you should re-grade before the container arrives.
If your container will sit on piers, install adjustable steel brackets on top of each pier. These brackets allow fine-tuning of height after the container is placed, which is far easier than trying to get poured concrete perfectly level across multiple separate piers. The brackets bolt to anchor bolts set in the wet concrete during the pour.
Once your supports are set and verified level, do a final inspection of the entire site. Confirm that drainage grades slope away from the pad, that the vapor barrier is intact and properly overlapped, and that there’s no standing water anywhere in the footprint area. This is also the time to verify that your delivery access is clear: most containers arrive on tilt-bed trucks that need at least 60 feet of straight clearance and 14 feet of overhead clearance.
Pre-Delivery Checklist and Maintenance Tips
The ground work is done, but a few final checks separate a good installation from a great one. Use this checklist the day before your container delivery:
- Confirm the delivery truck has clear access: minimum 12 feet wide, 60 feet long for a tilt-bed, and 14 feet of overhead clearance (watch for power lines and tree branches)
- Verify all four corner support points are level within 1/2 inch
- Check that drainage grades slope away from the pad at 1-2%
- Ensure the vapor barrier is intact with no tears or exposed seams
- Remove any tools, materials, or debris from the placement area
- Mark the exact placement position with spray paint or stakes so the driver knows where to set the container
- Have steel shims on hand for fine adjustments after placement
Once your container is in place, ground preparation doesn’t become a “set and forget” situation. Inspect the foundation and supports twice a year: once in spring after freeze-thaw cycles and once in fall before winter weather sets in. Look for signs of settling, erosion around the pad edges, or water pooling near the container. Catch these issues early and they’re simple fixes. Ignore them and you’re looking at releveling or even relocating the container.
Keep vegetation trimmed back at least two feet from the container on all sides. Plants trap moisture against the steel walls and restrict airflow underneath the unit. Clean out your drainage channels or French drains annually, removing leaves and sediment that reduce flow capacity.
For buyers comparing different container sizes and grades, keep in mind that a one-trip container arrives in near-new condition with factory-applied paint and minimal wear, while a cargo worthy or wind and watertight used shipping container may show surface rust that benefits from a protective coating before placement. Either way, the ground beneath the container matters as much as the condition of the container itself.
Lease Lane Containers provides delivery planning support that covers site access, turning radius, overhead clearance, and placement logistics. If you’re unsure whether your site is ready, the Raleigh-based team can walk you through the specifics for your property and container size before scheduling delivery.
Whether you’re placing a single 20-foot unit for farm equipment storage or setting up multiple 40-foot high cube shipping containers for a commercial project, the preparation process follows the same five steps. Soil assessment, clearing and leveling, foundation selection, moisture management, and final leveling with corner supports: each step builds on the last, and skipping any of them creates problems that are harder and more expensive to fix later.
Ready to find the right container for your project? Browse available inventory to compare sizes, grades, and pricing, or contact us directly to discuss your site setup and delivery requirements.


