6 Steps to Prepare for a Shipping Container Delivery
Table of Contents
- Table of Contents
- Step 1: Choose the Ideal Placement Site
- Assessing Ground Stability and Drainage
- Measuring for Clearance and Footprint
- Step 2: Clear a Path for the Delivery Truck
- Checking Vertical and Horizontal Obstructions
- Step 3: Select and Install a Foundation
- Concrete Pads vs. Gravel Footings
- Using Railroad Ties or Paving Stones
- Step 4: Determine the Container Orientation
- Deciding Between Doors Cab-Forward or Rear-Facing
- Step 5: Verify Local Permits and Regulations
- Zoning Laws and HOA Restrictions
- Step 6: Final Safety Check and Delivery Day Coordination
- Communicating with the Driver
- Post-Delivery Inspection and Maintenance Tips
- Final Delivery Preparation Checklist
Table of Contents
- Step 1: Choose the Ideal Placement Site
- Step 2: Clear a Path for the Delivery Truck
- Step 3: Select and Install a Foundation
- Step 4: Determine the Container Orientation
- Step 5: Verify Local Permits and Regulations
- Step 6: Final Safety Check and Delivery Day Coordination
- Post-Delivery Inspection and Maintenance Tips
A 20-foot shipping container weighs roughly 5,000 lbs empty. A 40-foot high cube tips the scales at around 8,500 lbs. When a truck rolls onto your property to drop one of these steel structures, there’s zero room for improvisation. The ground needs to be ready, the path needs to be clear, and you need a plan for exactly where that container is going to sit – possibly for years. Preparing for a shipping container delivery is one of those tasks that looks simple on paper but punishes shortcuts in practice. A soft patch of ground, a low-hanging branch, or a missed permit can turn a straightforward drop into a costly delay or, worse, a container that sinks, shifts, or blocks access to your property. The six steps below cover everything from site selection to delivery day coordination. Whether you’re a contractor staging materials on a job site, a homeowner adding backyard storage, or a farm operator setting up equipment shelter in rural North Carolina, this process is the same. Get the site right before the truck arrives, and the rest falls into place. If you’re still deciding on the right container size or grade for your project, Lease Lane Containers offers practical buying guidance to help you compare options before you commit.
Step 1: Choose the Ideal Placement Site
Where you place your container affects everything that follows: foundation costs, drainage behavior, accessibility, and even how well the doors operate over time. Most buyers default to “the flattest spot in the yard,” which is a reasonable instinct but not always the right answer. The best placement site balances structural support, water management, and practical access.
Start by walking your property with a tape measure and a critical eye. Think about how you’ll use the container daily. If it’s workshop storage, you want it close to your work area. If it’s inventory overflow for a small business, proximity to your loading dock or parking area matters. A container placed 200 feet from where you actually need it becomes a daily frustration.
Consider sun exposure too. A container sitting in full southern sun in a Raleigh summer will heat up significantly inside. If you’re storing temperature-sensitive materials, partial shade from a tree line or building can make a measurable difference in interior conditions.
Assessing Ground Stability and Drainage
The single biggest mistake in container placement is ignoring what’s underneath. Shipping containers exert concentrated weight at their four corner castings, where the structural load transfers to the ground. A standard 20-foot container puts roughly 1,250 lbs on each corner when empty, and that number climbs fast once you load it.
Soft, clay-heavy soil – common throughout Wake County and much of central North Carolina – can compress and shift under that load, especially after heavy rain. Walk the site after a storm. If your boots sink or you see standing water, that spot needs either significant ground prep or a different location entirely. Sandy or loamy soils with good natural drainage are ideal. If you’re working with clay, plan on a gravel pad at minimum.
Drainage is the other half of this equation. Water pooling under or around a container accelerates corrosion on the underside and can undermine your foundation over time. The site should slope gently away from the container’s footprint – a grade of about 1-2% is sufficient. If natural drainage doesn’t cooperate, a French drain or gravel channel can redirect water before it becomes a problem.
Measuring for Clearance and Footprint
A 20-foot container occupies a footprint of roughly 8 feet by 20 feet. A 40-foot container stretches to 8 feet by 40 feet. High cube containers add about a foot of height, standing 9 feet 6 inches tall compared to the standard 8 feet 6 inches. These are the bare minimums – you need additional clearance on every side.
Plan for at least 3 feet of clearance on each side for airflow and access. On the door end, allow 8 to 10 feet so the doors can swing fully open without hitting a fence, wall, or tree. Measure twice. Sketch it on paper. A container that “should fit” but doesn’t clear your fence line by 4 inches is a problem you’ll discover at the worst possible moment – when the delivery truck is idling in your driveway.
Step 2: Clear a Path for the Delivery Truck
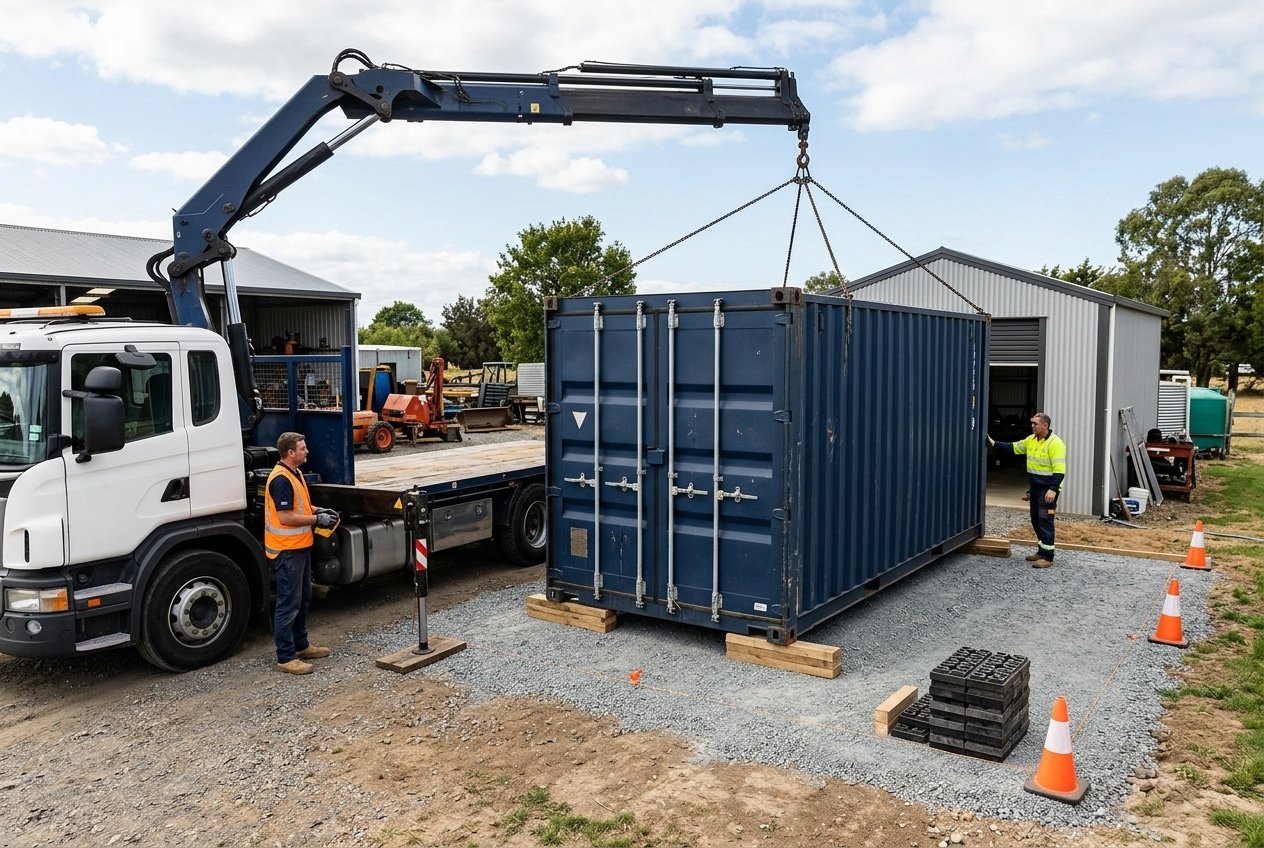
The delivery truck needs a clear, straight, or gently curving path from the road to the placement site. This is where many first-time buyers underestimate the requirements. A tilt-bed truck delivering a 20-foot container is typically 40 to 50 feet long overall. A truck carrying a 40-foot container can stretch 65 feet or more. These vehicles need room to maneuver, and they don’t handle tight turns well.
The path should be at least 12 feet wide – 14 feet is better if you have it. The surface needs to support the combined weight of the truck and container, which can exceed 50,000 lbs for a loaded delivery. Gravel driveways generally hold up fine. Soft dirt, fresh asphalt, or rain-soaked lawns can be a different story. If your driveway is paved, check for any weight limits or culverts that might not handle the load.
Walk the entire route from the street to the placement spot. Look for anything that narrows the path: parked vehicles, mailboxes, decorative boulders, retaining walls, or garden beds that encroach on the lane. Move what you can. Flag what you can’t so the driver sees it.
Checking Vertical and Horizontal Obstructions
Overhead clearance is the obstruction people forget most often. A shipping container on a tilt-bed truck sits about 14 feet off the ground at its highest point during the tilt-off process. Power lines, tree branches, carport overhangs, and basketball hoops all become potential hazards.
Walk the delivery route and look up. Tree branches that seem “high enough” from the ground often aren’t once you account for a 14-foot clearance requirement. If branches need trimming, handle it at least a week before delivery day – not the morning of. For power lines, contact your utility company if there’s any question about clearance. A container touching a live power line is a life-threatening situation, full stop.
Horizontal obstructions matter just as much. Gates need to be wide enough. Fence posts near the path should be flagged with bright tape or temporarily removed. If the truck needs to turn, the turning radius for a standard delivery vehicle is roughly 40 to 55 feet depending on the trailer length. Tight 90-degree turns from a street into a driveway are often the trickiest part of the entire delivery. Measure the turn, and if it looks tight, call your delivery provider to discuss options before the truck is dispatched. Lease Lane Containers’ Raleigh-based team provides delivery planning support that covers access, turning radius, and overhead clearance for exactly these situations.
Step 3: Select and Install a Foundation
A shipping container should never sit directly on bare soil. Even on firm ground, direct soil contact traps moisture against the steel floor frame and accelerates rust. A proper foundation keeps the container level, promotes airflow underneath, and prevents settling over the life of the structure.
The right foundation depends on your soil conditions, budget, intended use, and how permanent the installation will be. A temporary storage setup on a construction site has different needs than a container office that will sit on a residential property for a decade.
Concrete Pads vs. Gravel Footings
Concrete is the gold standard for permanent installations. A full concrete pad – typically 4 to 6 inches thick, poured over compacted gravel – provides a perfectly level, stable surface that won’t shift. For a 20-foot container, you’re looking at a pad of roughly 8 by 20 feet, which runs approximately $1,500 to $3,000 depending on local concrete prices and site conditions. In the Raleigh-Durham area, expect pricing toward the higher end if site grading is needed.
An alternative to a full pad is concrete pier footings placed at each corner casting. Four piers – each about 24 inches square and 12 inches deep – cost significantly less and work well on stable ground. The container’s weight transfers through the corner castings anyway, so full-pad coverage isn’t structurally necessary for most storage applications.
Gravel footings are the most common choice for semi-permanent setups. A compacted gravel pad of 6 to 8 inches, extending about a foot beyond the container’s footprint on all sides, provides solid drainage and reasonable load distribution. Use crushed stone (not round river rock, which shifts under load) and compact it with a plate compactor. Total cost for a 20-foot pad is typically $500 to $1,200.
Using Railroad Ties or Paving Stones
Railroad ties placed under each side rail of the container are a popular budget option, especially on farms and rural properties. Two ties running the length of each side rail lift the container 6 to 7 inches off the ground, allowing airflow underneath while distributing weight along the frame. Cost is minimal – often under $200 for the ties themselves.
The downside is that railroad ties can rot over time, especially in humid climates. Treated ties last longer but still need inspection every few years. They also don’t self-level, so you need to prepare the ground beneath them carefully.
Concrete paving stones or solid concrete blocks placed at each corner casting and midpoint offer another middle-ground option. They’re inexpensive, widely available at home improvement stores, and easy to level using a layer of sand or fine gravel. For a 20-foot container, six blocks – four at the corners and two at the midpoints – provide adequate support for most storage loads.
Step 4: Determine the Container Orientation
This step gets overlooked more than any other, and it’s one you can’t easily fix after the fact. Once a 5,000-lb steel box is on the ground, repositioning it requires heavy equipment. Think through orientation before the truck arrives.
The primary consideration is door placement. Standard shipping containers have double doors on one end. Where those doors face determines how you access the interior, how the doors interact with wind and weather, and how the container relates to adjacent structures or pathways.
Deciding Between Doors Cab-Forward or Rear-Facing
During a tilt-bed delivery, the container slides off the back of the truck. If the doors face the cab (cab-forward), the doors will end up closest to the driveway or access road after placement. If the doors face the rear of the truck, they’ll be at the far end of the placement site.
For most residential and small business setups, cab-forward placement works best. It puts the doors closest to your access point, which means shorter trips when loading and unloading. On a construction site where the container sits at the back of the lot, rear-facing doors might make more sense if foot traffic approaches from that direction.
Wind direction matters too. Doors facing into prevailing winds are harder to manage on blustery days – a fully open container door acts like a sail and can be dangerous. In central North Carolina, prevailing winds come from the southwest for much of the year. If possible, orient doors away from that direction or perpendicular to it.
Think about future plans as well. If you might add a second container later for a connected workspace, the orientation of the first container dictates the layout of everything that follows. Sketch your long-term vision, even if it’s rough, before locking in placement.
Step 5: Verify Local Permits and Regulations
Permit requirements for shipping containers vary wildly by jurisdiction. Some rural counties in North Carolina have almost no restrictions on placing a container on private property. Some municipalities require a building permit for any structure over a certain square footage. Assuming you don’t need a permit is a gamble that can result in fines, forced removal, or complications when you sell the property.
Contact your local planning or zoning office before ordering your container. In Wake County, the Planning, Development, and Inspections department handles these inquiries and can be reached through the Wake County government website. Ask specifically about shipping containers – some codes reference them as “accessory structures” or “temporary storage buildings,” and the rules differ depending on classification.
Zoning Laws and HOA Restrictions
Zoning determines what types of structures are allowed on your property and where they can be placed. Common zoning restrictions for shipping containers include setback requirements (minimum distance from property lines, typically 5 to 15 feet), maximum lot coverage percentages, and height limits that could affect high cube shipping containers.
If your property is in a residential zone, the rules tend to be stricter. Commercial and agricultural zones are generally more permissive. Some jurisdictions allow containers as temporary structures (under 180 days) without a permit but require one for permanent placement.
HOA restrictions are a separate layer entirely. Many homeowners associations prohibit shipping containers outright or require architectural review board approval. Check your HOA covenants, conditions, and restrictions (CC&Rs) before spending money on site prep. Getting a container delivered only to receive a violation notice the following week is an expensive headache. If your HOA requires screening or fencing around the container, factor that cost and timeline into your planning.
Step 6: Final Safety Check and Delivery Day Coordination
The 48 hours before delivery are your final window to catch problems. Walk the delivery route one more time. Confirm that nothing has changed since you prepped the site – a neighbor’s parked trailer, a new pile of landscaping materials, or a recent rainstorm softening the ground can all derail a delivery.
Verify your foundation is complete and level. Use a 4-foot level across the foundation surface in multiple directions. A container placed on an unlevel foundation will have doors that bind, gaps that let water in, and structural stress that compounds over time. The tolerance is about 1 inch of variation across the full length of the container. Anything more than that needs correction before the truck arrives.
Communicating with the Driver
Call your delivery provider the day before to confirm the delivery window and discuss any site-specific concerns. Good drivers appreciate a heads-up about tight turns, soft ground, overhead lines, or unusual access points. If you’ve taken photos of the path and placement site, share them – a picture eliminates ambiguity faster than a verbal description.
On delivery day, be present on site. The driver will need guidance on exact placement, orientation, and any last-minute adjustments. Clear communication during the actual drop saves time and prevents errors. Agree on hand signals if the truck engine noise makes conversation difficult. Designate a safe viewing area for anyone else on the property – children, pets, and bystanders should be well clear of the delivery zone. A tilt-bed operation involves heavy moving steel and hydraulic equipment, and the safety radius should be at least 50 feet from the truck.
Post-Delivery Inspection and Maintenance Tips
Once the container is on the ground, inspect it before the driver leaves. Check all four corners to confirm the container is sitting squarely on the foundation. Open and close both doors to verify they swing freely and latch properly. Look at the roof for dents or pooling areas that could collect water. Examine the floor inside for any damage that occurred during transport.
For used shipping containers, pay extra attention to the condition of the door gaskets, the integrity of the corrugated wall panels, and any signs of rust at the base. Containers graded as cargo worthy will show some wear but should be structurally sound and watertight. Wind and watertight units are a step below and suitable for dry storage but may have minor cosmetic issues. Knowing your container’s grade helps set realistic expectations during inspection.
For ongoing maintenance, apply a rust-inhibiting paint or spray to any bare metal spots within the first month. Check door hinges and latch rods every six months and apply silicone lubricant to keep them operating smoothly. Inspect the roof annually for standing water or debris accumulation – a leaf-clogged roof holds moisture and accelerates corrosion. Budget roughly $100 to $200 per year for basic container maintenance supplies.
Final Delivery Preparation Checklist
- Site selected with stable ground, proper drainage, and adequate clearance on all sides
- Delivery path cleared to at least 12 feet wide with 14 feet of overhead clearance
- Foundation installed and verified level (within 1 inch across the full length)
- Container orientation decided and communicated to the delivery provider
- Local permits obtained and HOA approval secured if applicable
- Driver contacted with site details, photos, and confirmed delivery window
- Safety perimeter established and bystanders cleared from the drop zone
Knowing how to prepare for your shipping container delivery before the truck arrives is the difference between a smooth 30-minute drop and a frustrating, expensive delay. Every step in this guide exists because real buyers have learned these lessons the hard way. Take the time to get it right once, and your container will serve you well for decades.
If you’re ready to move forward, browse our inventory to compare container sizes, grades, and pricing for your project. Have questions about site prep, delivery access, or choosing the right container? Contact us directly – the Lease Lane Containers team is here to help you plan a delivery that goes right the first time.


