How to Prepare for a Shipping Container Delivery
Table of Contents
- Table of Contents
- Assessing Site Accessibility and Delivery Routes
- Checking for Overhead Obstructions
- Calculating Turn Radius and Entry Clearance
- Selecting and Leveling the Foundation Surface
- Choosing Between Gravel, Concrete, and Paving Stones
- Methods for Ensuring a Perfectly Level Base
- Navigating Local Zoning Laws and Permits
- Determining the Ideal Container Orientation
- Deciding Between Doors Facing the Truck or Cabin
- Understanding Delivery Truck Types and Requirements
- Tilt-Bed vs. Flatbed Trailer Logistics
- Final Safety Checklist for Delivery Day
- Ground Conditions and Weather Considerations
- Post-Delivery Inspection and Maintenance
Table of Contents
- Assessing Site Accessibility and Delivery Routes
- Checking for Overhead Obstructions
- Calculating Turn Radius and Entry Clearance
- Selecting and Leveling the Foundation Surface
- Choosing Between Gravel, Concrete, and Paving Stones
- Methods for Ensuring a Perfectly Level Base
- Navigating Local Zoning Laws and Permits
- Determining the Ideal Container Orientation
- Deciding Between Doors Facing the Truck or Cabin
- Understanding Delivery Truck Types and Requirements
- Tilt-Bed vs. Flatbed Trailer Logistics
- Final Safety Checklist for Delivery Day
- Ground Conditions and Weather Considerations
- Post-Delivery Inspection and Maintenance
A 20 ft shipping container weighs roughly 5,000 lbs empty. A 40 ft high cube tips the scales at around 8,500 lbs. When a truck carrying that kind of load pulls onto your property, there is zero room for improvisation. The driveway needs to be wide enough, the ground needs to be firm enough, and every low-hanging branch or power line in the path needs to be accounted for before the driver shifts into reverse. Most failed deliveries trace back to a single problem: the site wasn’t ready. That means wasted time, rescheduling fees, and a container sitting on a truck that can’t get close enough to place it. This shipping container delivery access guide walks through every preparation step, from measuring your driveway to inspecting the container after it’s on the ground. Whether you’re a contractor staging equipment storage on a job site, a homeowner adding backyard storage in Wake County, or a rural property owner off a gravel road outside Raleigh, the principles are the same. Get the site right, and the delivery is a 15-minute event. Get it wrong, and you’re looking at delays, extra costs, and potential property damage. Lease Lane Containers’ delivery planning support helps buyers think through access and placement before the truck ever rolls out, which is exactly the kind of preparation that separates a smooth drop from an expensive headache.
Assessing Site Accessibility and Delivery Routes
The delivery truck needs a clear, unobstructed path from the public road to the exact spot where your container will sit. That sounds simple, but the details trip people up constantly. Start by physically walking the route the truck will take. Bring a tape measure, a notepad, and your phone camera. Document every potential pinch point: gate openings, fence posts, mailboxes, parked vehicles, landscaping features, and drainage ditches.
A standard delivery truck with a 40 ft container on the back stretches roughly 65 to 75 ft in total length. Even a 20 ft container on a tilt-bed truck runs about 35 to 40 ft bumper to bumper. These vehicles don’t handle like your pickup. They need wide, gradual approaches and firm surfaces that won’t collapse under 40,000 to 60,000 lbs of gross vehicle weight.
Sketch a simple overhead diagram of your property showing the road, driveway, any structures, and the intended placement spot. Mark distances between obstacles. This diagram becomes your communication tool with the delivery company, and it eliminates the back-and-forth guessing that wastes everyone’s time.
Checking for Overhead Obstructions
Power lines are the number one overhead hazard. A shipping container sitting on a tilt-bed trailer reaches approximately 13 to 14 ft in the air during the tipping process. Standard residential power lines hang between 15 and 18 ft, but they sag in hot weather and can dip lower over driveways. Call your local utility provider if you’re unsure about clearance heights. In North Carolina, Duke Energy and local cooperatives will typically confirm line heights at no charge.
Tree branches are the second most common problem. That oak canopy shading your driveway looks great until a steel container clips it at 13 ft. Walk the entire delivery path and look up. Trim anything below 15 ft to give a safe buffer. Don’t forget about the return path: the truck needs overhead clearance on the way out, too.
Other obstructions to check include carport overhangs, basketball hoops, satellite dishes mounted on poles, and decorative archways. If you have a covered gate entrance, measure the height from the ground to the lowest point of the structure.
Calculating Turn Radius and Entry Clearance
A tilt-bed truck needs a minimum turning radius of about 40 to 50 ft, depending on the rig. If your driveway meets the road at a sharp 90-degree angle, the truck may not be able to make the turn without crossing into a neighbor’s yard or a drainage ditch. Measure the width of your driveway at its narrowest point: you need at least 12 ft of clear width for a standard delivery, and 14 ft is more comfortable.
For properties accessed by rural roads or long gravel driveways, measure the full width at every point. A driveway that starts at 14 ft but narrows to 9 ft around a curve is a problem. Delivery drivers won’t risk damaging their equipment or your property to squeeze through a tight gap.
The rule of thumb is simple: if a full-size moving truck can comfortably reach your placement spot, a container delivery truck probably can too. If you’ve never had anything larger than a UPS van on your property, you likely need to make adjustments. Lease Lane Containers provides delivery planning guidance that covers turning radius, overhead clearance, and site access requirements specific to your container size.
Selecting and Leveling the Foundation Surface
The ground your container sits on affects everything: structural integrity, door operation, moisture control, and long-term durability. A shipping container is engineered to carry its load on its four corner castings and the bottom rail structure. It does not need a full slab underneath, but it absolutely needs a stable, level surface that distributes weight properly and prevents settling.
Skipping foundation prep is the most expensive shortcut buyers take. A container that settles unevenly by even two inches will bind its doors, warp its frame over time, and create low spots where water pools against the steel. Fixing a foundation problem after a 5,000 lb container is already sitting on it costs far more than doing it right the first time.
Choosing Between Gravel, Concrete, and Paving Stones
Compacted gravel is the most popular foundation for residential and rural container placements. A 6-inch bed of compacted 3/4-inch crushed stone provides excellent drainage, distributes weight well, and costs between $500 and $1,500 for a 20 ft container pad depending on your region. It’s the go-to choice for farms, backyards, and job sites where permanent installation isn’t the goal.
Concrete pads offer the most stable long-term foundation but cost significantly more: typically $2,000 to $5,000 for a properly poured slab with footings. Concrete makes sense for permanent installations, container offices, or situations where the container will carry heavy internal loads consistently. If you’re in an area with expansive clay soils, common in parts of central North Carolina, concrete with proper footings prevents the seasonal heaving that can shift a container off level.
Paving stones or concrete blocks placed under the four corner castings are a budget-friendly middle ground. Use blocks rated for at least 3,000 PSI and make sure each one sits on compacted ground. This approach works well for temporary storage but isn’t ideal for containers you plan to access daily or load heavily.
Methods for Ensuring a Perfectly Level Base
Rent or borrow a builder’s level or a long spirit level (4 ft minimum). Check your prepared surface diagonally, side to side, and front to back. You’re aiming for no more than 1 inch of variation across the full length of the container. For a 40 ft container, that’s a tolerance of roughly 1 inch per 40 ft, which is achievable with careful grading.
If you’re working with a gravel pad, use a plate compactor to firm the surface after grading. Compact in 2-inch lifts for best results. Check level after each pass of the compactor, because vibration can shift material in unexpected ways.
For concrete block foundations, set each block individually and check that all four corners sit at the same height. A laser level speeds this process dramatically. Shim with thin steel plates if needed: never use wood shims, because they rot and compress over time, creating the settling problems you’re trying to avoid.
Navigating Local Zoning Laws and Permits
Zoning regulations for shipping containers vary wildly from one municipality to the next. Inside Raleigh city limits, placing a shipping container on residential property typically requires a zoning review, and there may be restrictions on visibility from the street, maximum duration, and setback distances from property lines. Wake County’s planning department can be reached at (919) 856-6335 for specific questions about unincorporated areas.
Many rural counties in North Carolina have minimal restrictions on shipping containers used for agricultural storage. But “minimal” doesn’t mean “none.” Check before the container arrives, not after a code enforcement officer shows up. The typical items you’ll need to verify include:
- Setback requirements from property lines (often 5 to 15 ft)
- Maximum number of containers allowed on a single parcel
- Whether a building permit is required for permanent placement
- HOA restrictions if your property falls within a homeowners association
- Whether the container qualifies as an accessory structure under local code
Some jurisdictions require a simple zoning permit that costs $50 to $150 and takes a few days to process. Others require a full building permit with site plans, especially if you’re adding electrical, plumbing, or structural modifications. Contact your local planning or building inspection office directly. Don’t rely on secondhand information from forums or neighbors, because regulations change frequently and enforcement varies by jurisdiction.
If you’re placing a container for commercial use, such as on-site storage for a contracting business, expect stricter requirements including possible site plan review and fire code compliance.
Determining the Ideal Container Orientation
Where and how you position your container affects daily usability more than most buyers realize. Think about how you’ll actually use the container before the truck arrives, because repositioning a 5,000 to 8,500 lb steel box after delivery is neither cheap nor easy.
Consider sun exposure first. A container with its long side facing south will absorb significantly more heat than one oriented east-west. If you’re storing temperature-sensitive items or plan to use the container as a workspace, orienting the long axis north-south reduces solar heat gain. In North Carolina’s summers, where temperatures regularly exceed 90°F, this detail matters.
Think about prevailing wind and rain direction as well. Positioning the doors away from the dominant weather direction (typically southwest in the Raleigh area) keeps rain from blowing directly into the container every time you open it.
Deciding Between Doors Facing the Truck or Cabin
This is the most common orientation question buyers face. If the delivery truck approaches from your driveway and the container slides off the back of a tilt-bed, the doors will face the direction the truck came from. That’s the default position. Changing it requires either a different delivery approach angle or a crane, which adds $500 to $1,500 to your delivery cost.
Doors facing your home or workspace means shorter walking distance when loading and unloading. Doors facing away from the house means better aesthetics and less visual clutter from your main living area. Neither answer is universally correct: it depends on your priorities.
For contractors using a container as job site storage, doors facing the work area is almost always the right call. For homeowners adding backyard storage, doors facing the house typically wins on convenience. Decide before delivery day and communicate your preference clearly to the delivery team. A quick site photo with an arrow showing the desired door direction eliminates any confusion.
Understanding Delivery Truck Types and Requirements
The type of truck used for your shipping container delivery determines how much space you need, how the container gets placed, and what ground conditions are required. Not all delivery methods work for all sites, so understanding the differences helps you plan accurately and avoid day-of surprises.
Most residential and small commercial deliveries use one of two truck types. The right choice depends on your site layout, ground conditions, and container size. Your container supplier should help you determine which method fits your situation, and Lease Lane Containers’ team provides this guidance as part of their delivery planning process.
Tilt-Bed vs. Flatbed Trailer Logistics
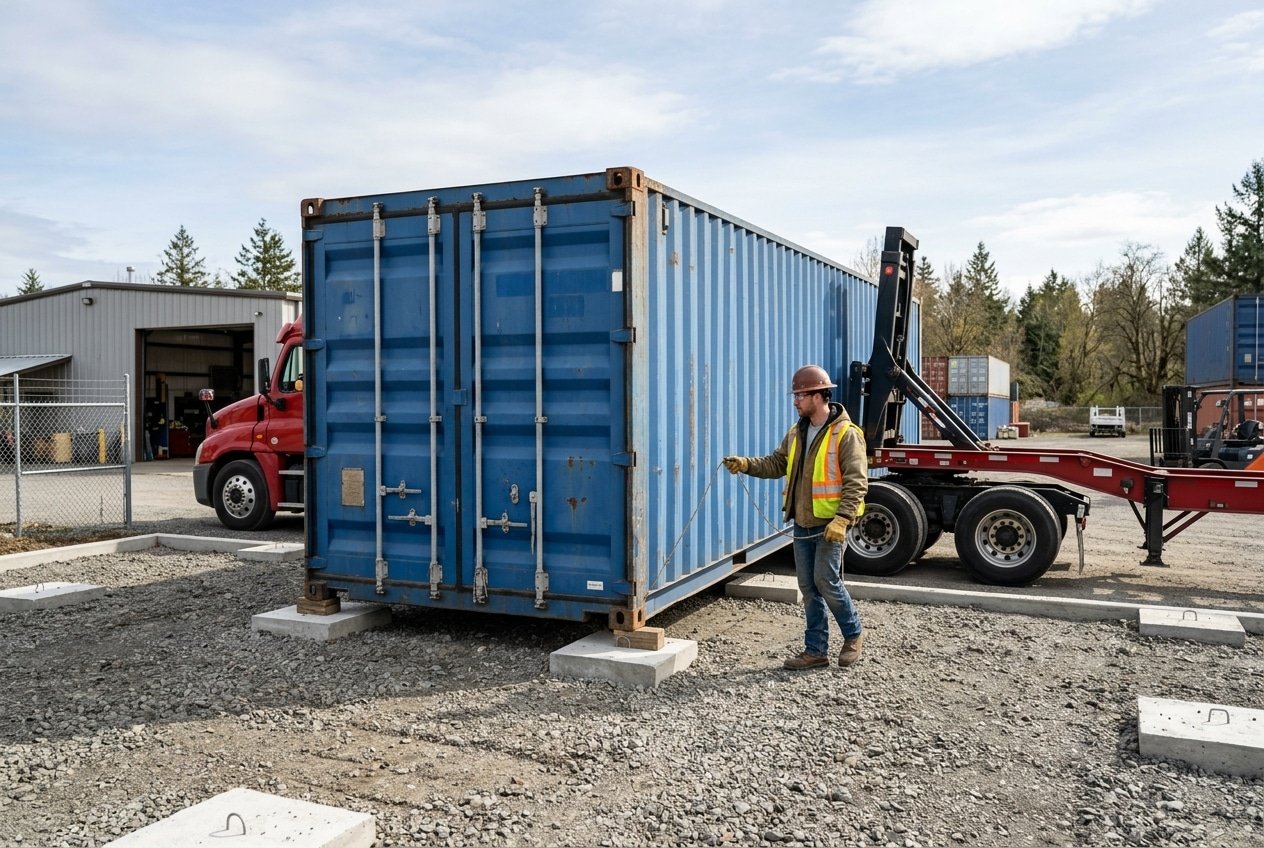
A tilt-bed truck (also called a rollback or slide-off) is the most common delivery method for 20 ft containers and some 40 ft units. The truck bed tilts hydraulically, and the container slides off the back onto the ground. This method requires approximately 80 to 100 ft of straight, level space behind the truck for a 40 ft container, or about 50 to 60 ft for a 20 ft unit. The ground where the container lands must be firm and level, because the container slides with significant momentum.
Tilt-bed delivery is typically the most affordable option, running $150 to $500 for local deliveries depending on distance. The trade-off is that you need more linear space and the container orientation is fixed by the truck’s approach angle.
Flatbed trailers with crane service offer more placement flexibility. A crane can lift the container over obstacles, rotate it to any orientation, and place it precisely where you want it. This is the go-to method for tight sites, fenced yards, and locations where the truck can’t get close to the final placement spot. Crane delivery typically costs $800 to $2,000 on top of the standard delivery fee, but it solves access problems that would otherwise make delivery impossible.
A third option, less common but worth knowing about, is a chassis delivery where the container arrives on a dedicated container chassis and requires a forklift or crane on-site to offload. This method is primarily used for commercial and industrial sites that already have heavy equipment available.
Final Safety Checklist for Delivery Day
Delivery day should be anticlimactic. If you’ve done the preparation work outlined in this guide for shipping container delivery access, the actual placement takes 15 to 30 minutes. But a quick final check the morning of delivery catches last-minute issues that can derail an otherwise smooth process.
Walk the delivery route one final time. Confirm that no vehicles are parked in the path, no new obstacles have appeared (trash cans, construction materials, kids’ toys), and all gates are open and secured so they won’t swing into the truck. Have your phone charged and keep the delivery driver’s number handy. Clear communication during the final approach prevents most last-minute problems.
- Verify the placement spot is still level and hasn’t been disturbed by recent activity
- Remove any stakes, garden hoses, or temporary items from the delivery path
- Confirm that neighbors are aware if the truck needs to use shared access roads
- Have someone available on-site to guide the driver if visibility is limited
- Keep children, pets, and bystanders at least 50 ft from the placement area during delivery
Ground Conditions and Weather Considerations
Rain in the 48 hours before delivery is the most common weather-related complication. Soft, saturated ground can’t support 40,000 to 60,000 lbs of truck weight. If your delivery path crosses grass, dirt, or poorly drained areas, even moderate rain can turn firm ground into a trap. A stuck delivery truck on your property is an expensive problem: towing fees for heavy trucks start around $500 and climb quickly.
Check the weather forecast three days before your scheduled delivery. If heavy rain is expected, contact your delivery company proactively to discuss rescheduling. Most reputable suppliers will work with you on timing rather than risk a stuck truck or damaged property.
In winter months, frozen ground is actually excellent for delivery: it’s hard and stable. But ice on paved surfaces creates traction problems for the truck. If temperatures are below freezing, spread sand or gravel on any paved sections of the delivery route. Avoid using salt, which can accelerate corrosion on the container’s steel undercarriage.
Post-Delivery Inspection and Maintenance
Once the container is on the ground, inspect it before the delivery driver leaves. This is your window to document any damage that may have occurred during transport and to confirm that the container matches what you ordered. A systematic 10-minute inspection saves you from disputes later.
Start with the exterior. Walk all four sides and check for dents, holes, excessive rust, and paint damage. Some cosmetic wear is normal on used shipping containers, especially those graded as cargo worthy or wind and watertight. But structural damage like cracked welds, bent corner castings, or holes in the corrugated panels is a different matter. Photograph everything.
Open and close both doors completely. They should swing freely without binding or scraping. Check the door gaskets for cracks and compression: these rubber seals are what keep water out. If a door sticks or doesn’t seal properly, note it immediately with the driver present.
Inspect the interior with a flashlight. Look at the ceiling for light leaks, which indicate holes or failed seams. Check the floor for soft spots, water stains, or damage. A marine-grade plywood floor in good condition should feel solid underfoot with no flex or sponginess.
For ongoing maintenance, the 20-20-20 rule works well: every 20 weeks, spend 20 minutes doing a visual inspection, and budget about $20 per year for touch-up paint and lubricant. Spray door hinges and locking bars with silicone lubricant twice a year. Touch up any paint chips or scratches with rust-inhibiting primer and matching paint before corrosion takes hold. Keeping leaves and debris away from the roof and base prevents moisture traps that accelerate rust.
If you’re still deciding on the right container size, grade, or setup for your project, browse our inventory to compare options across one-trip, cargo worthy, and wind and watertight grades. And if you have specific questions about site access, placement planning, or delivery logistics, contact us directly: the Lease Lane Containers team in Raleigh is here to help you get the details right before delivery day arrives.


